Many individuals create a soundproof studio booth at home to control noise from traffic or neighbors. They often face challenges with material selection, cost, and space. A soundproof cubicle for home or an office sound booth can offer better isolation than soundproof phone boxes, especially when tailored to specific recording needs.
Planning and Building Your Soundproof Studio Booth
Choosing the Right Location
Selecting the best spot for a soundproof studio booth is the first step. Many people choose quieter areas of the home, such as a garage or basement, to reduce outside noise. These spaces often have fewer windows and less foot traffic. Building the booth in a corner can help maximize available space and improve sound isolation.
Tip: Avoid rooms near noisy appliances like refrigerators, dishwashers, or HVAC systems. Hard surfaces, such as tile or wood floors, can make noise worse by reflecting sound. Windows, especially single-pane types, let in outside sounds like traffic or barking dogs.
A ‘room within a room’ design, using wood framing and insulation, can further isolate the booth from the rest of the house. Decoupling the booth from existing walls and floors helps prevent vibrations from traveling into the recording space. Always check for echoes or reverberation before choosing the final location.
Gathering Materials and Tools
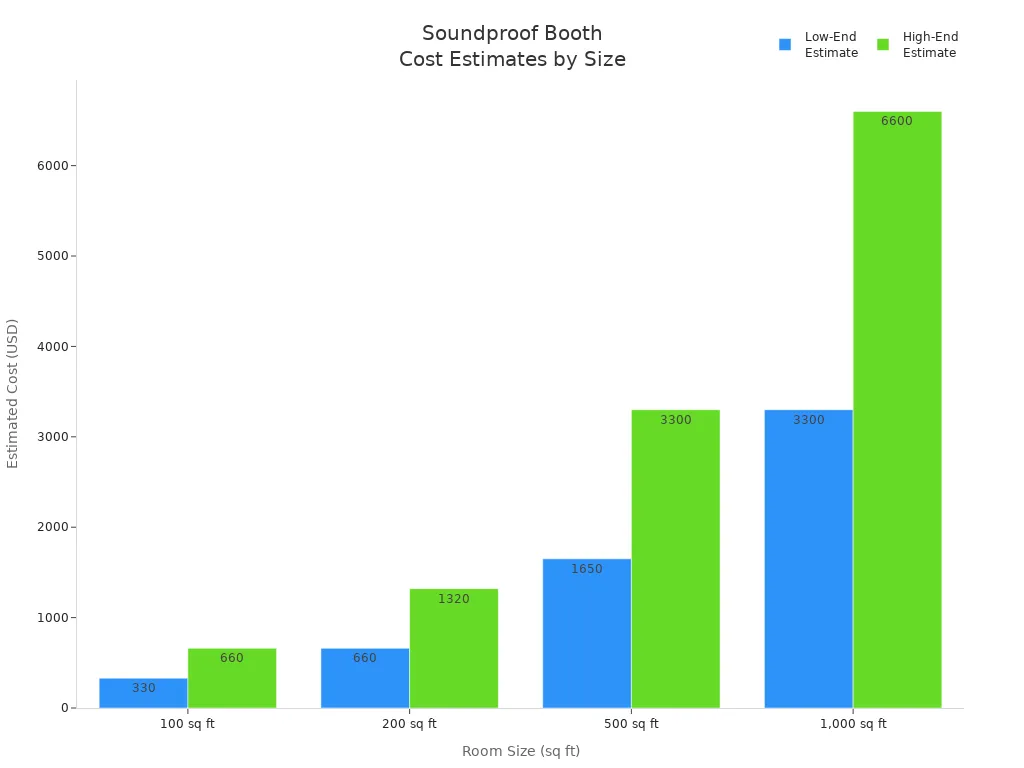
Building a soundproof studio booth requires careful planning and budgeting. The cost depends on the size of the booth and the quality of materials. Here is a table showing estimated costs for different room sizes:
| Room Size (sq ft) | Low-End Cost Estimate | High-End Cost Estimate |
|---|---|---|
| 100 | $330 | $660 |
| 200 | $660 | $1,320 |
| 500 | $1,650 | $3,300 |
| 1,000 | $3,300 | $6,600 |
Essential materials include wood for framing, multiple layers of drywall, soundproofing insulation like Quiet Batt®, and high-density barrier sheets such as Quiet Barrier®. Acoustic panels and foam help control echoes inside the booth. Tools like staple guns, clamps, and saws are also necessary. For doors and windows, solid core doors and double-glazed windows provide better sound isolation. Acoustic caulk and weather stripping are important for sealing gaps.
Note: Define a realistic budget before starting. Planning ahead helps avoid wasting time and money on ineffective materials.
Building the Structure: Walls, Door, and Window
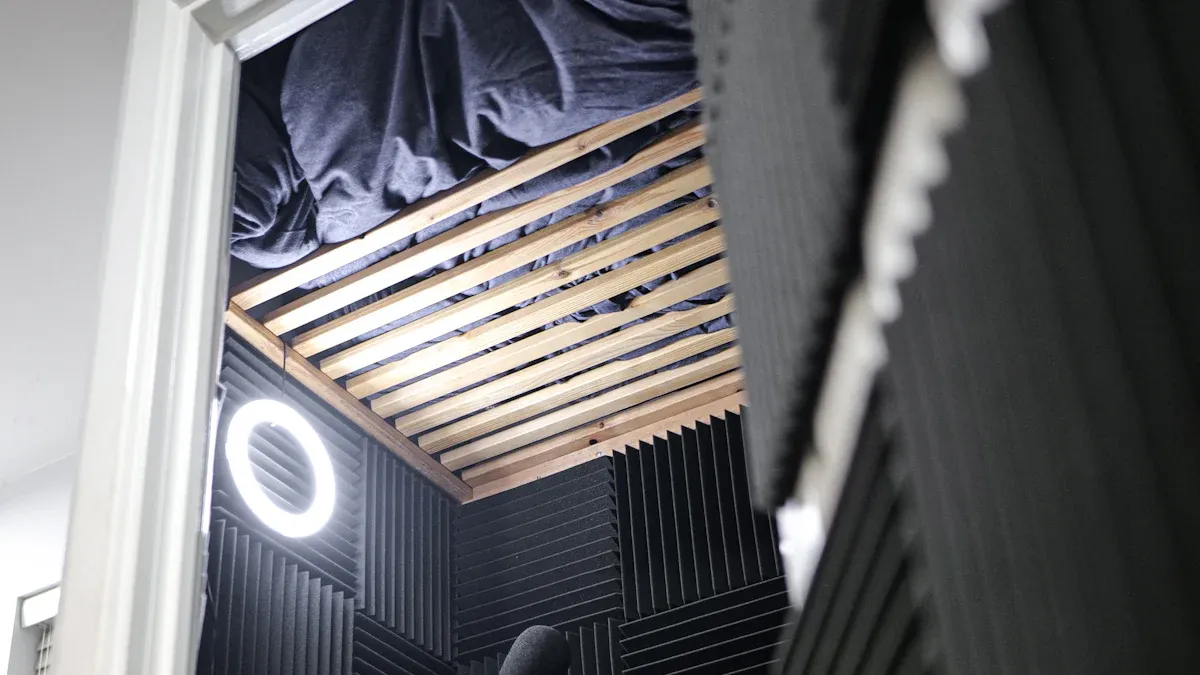
Constructing the booth begins with framing the walls using wood. Builders often use the ‘room within a room’ method, which means creating a separate structure inside the existing space. This approach decouples the booth from the main building and reduces vibration transfer. Adding mass and density to the walls is key. Multiple layers of drywall, combined with soundproofing compounds like Green Glue, block more sound. Filling wall cavities with mineral wool insulation absorbs vibrations.
For the door, a heavy, solid core model works best. Door seal kits and sweeps prevent sound from leaking through gaps. Some builders use double doors with an air gap between them for extra isolation. Windows should have double or triple glazing and sealed frames to reduce sound transmission.
Pro Tip: Use resilient channels or sound isolation clips between drywall and studs to further decouple the structure and improve soundproofing.
Sealing Gaps and Managing Cables
Even the best-built soundproof studio booth can fail if gaps and cracks are not sealed. Sound can escape through tiny openings around doors, windows, electrical outlets, and cable entry points. Acoustic caulk and weather stripping are essential for blocking these paths.
- Seal all cracks and gaps around doors, windows, and other openings.
- Use door sweeps to block sound at the bottom of doors.
- Apply acoustic caulk around electrical outlets and HVAC vents.
- Drill small, sealed holes for cables to enter the booth. Shorter cables reduce the size of these openings and help prevent noise leaks.
Remember: Careful cable management not only keeps the booth tidy but also helps maintain sound isolation.
By following these steps, anyone can plan and build a soundproof studio booth that meets their recording needs. Proper location, quality materials, solid construction, and attention to detail ensure the best possible sound isolation.
Soundproofing, Acoustic Treatment, and Setup

Adding Soundproofing Materials
A successful soundproof studio booth relies on the right combination of materials to block and absorb unwanted noise. Soundproofing focuses on stopping sound from entering or leaving the booth. Builders often use dense materials such as mass-loaded vinyl, double drywall, and specialized insulation to add mass and block sound transmission. Sealing all gaps with acoustic caulk and weatherstripping ensures no sound escapes through cracks or seams.
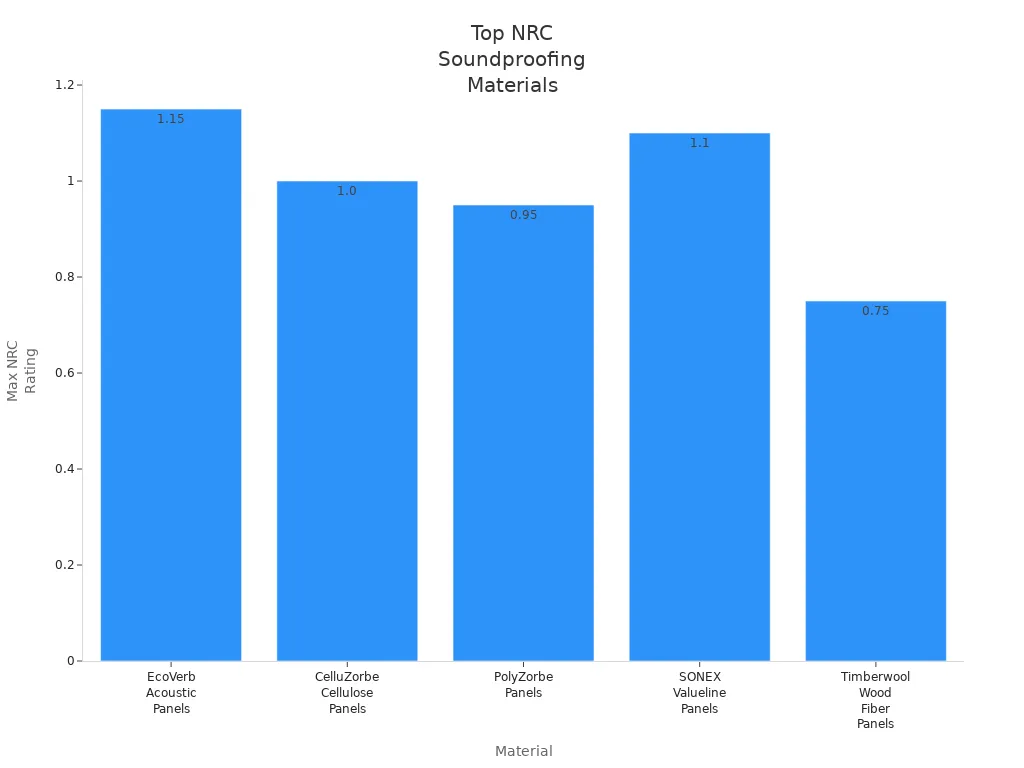
The Noise Reduction Coefficient (NRC) measures how well a material absorbs sound at key frequencies. Materials with NRC ratings above 0.7 are considered highly effective for reducing echo and noise. However, using only high-absorption materials can make a room sound unnatural or “dead.” A balanced approach, combining absorption and diffusion, creates a more natural recording environment.
| Material | NRC Rating | Description |
|---|---|---|
| EcoVerb Acoustic Panels | Up to 1.15 | Cotton fiber panels, cost-effective, DIY-friendly, suitable for homes and studios |
| CelluZorbe Cellulose Panels | Up to 1.0 | Environmentally friendly, good sound absorption and thermal insulation, for walls/ceilings |
| PolyZorbe Panels | Up to 0.95 | 100% polyester, decorative, tack-able, suitable for walls and ceilings |
| SONEX Valueline Panels | 0.75–1.10 | Acoustic control panels, suitable for recording environments, affordable |
| Timberwool Wood Fiber Panels | Up to 0.75 | Natural wood fiber, customizable, aesthetic, suitable for offices and music practice rooms |
Premium multilayer systems, such as those combining acoustic foam, butyl rubber, and aluminum foil, offer superior noise reduction and durability. These systems are easy to install and provide thermal insulation, but they may cost more than traditional materials. For those on a budget, classic options like foam, rubber, or mass-loaded vinyl remain effective, though they require more effort to install and may not last as long.
Note: Soundproofing blocks noise from entering or leaving the booth, while acoustic treatment improves the sound inside the booth.
Installing Acoustic Panels and Foam
Acoustic treatment manages how sound behaves inside the soundproof studio booth. Acoustic panels and foam reduce echo, control reverberation, and create a balanced sound environment. Panels are denser and absorb a wide range of frequencies, making them ideal for professional sound control. Foam is lighter and works best for high-frequency absorption, often used in smaller spaces or for specific areas like vocal booths.
| Aspect | Recommendation |
|---|---|
| Placement Points | Place panels at reflection points: mirror point between speakers and listener, side walls, ceiling, and corners (bass traps). |
| Wall Coverage | Cover all parallel walls evenly to prevent standing waves; avoid clustering panels in one corner. |
| Early Reflections | Prioritize treating early reflection points to reduce speaker boundary interference response (SBIR). |
| Bass Traps | Place bass traps in corners to absorb low frequencies. |
| Ceiling Panels | Use ceiling panels to supplement wall panels, but they are less effective if not opposite speakers. |
| Quantity | For high-quality recording studios, aim for near 100% wall coverage; home theaters may start at ~20%. |
| Panel Size & Thickness | Typical panels are 2 inches thick; smaller panels are easier to mount and handle. |
Acoustic panels provide broadband absorption, controlling low, mid, and high frequencies. They also improve the booth’s appearance and durability. Foam panels, shaped in cones or triangles, absorb high-end frequencies and are easy to install. For best results, distribute panels evenly on all walls, treat early reflection points, and add bass traps in corners. Ceiling panels can supplement wall panels, especially above the recording area.
Tip: Start with about 48 square feet of panels for a home studio. Increase coverage for better sound absorption.
Setting Up Lighting and Ventilation
Proper lighting and ventilation keep the soundproof studio booth comfortable and functional. LED lights work well because they produce little heat and do not create noise. Place lights in corners or on the ceiling to avoid shadows and glare on recording equipment.
Ventilation is essential for air quality and comfort. Silent fans combined with baffles or muffler boxes reduce noise transmission while allowing airflow. These systems force air through corners lined with sound-absorbing insulation, minimizing sound leaks. A return air duct prevents pressure buildup inside the booth. Pre-fabricated ventilation panels with silent fans and baffles are available for easy installation. Some users add portable AC units or open the booth door between takes to manage heat.
- Silent fans with baffles or muffler boxes reduce noise.
- Return air ducts maintain airflow and prevent pressure buildup.
- Pre-fabricated ventilation panels offer easy installation.
- Muffler boxes with internal dividers absorb sound and reduce fan noise.
- Portable AC units or opening doors between takes help manage temperature.
Remember: Good ventilation keeps the booth comfortable without sacrificing sound isolation.
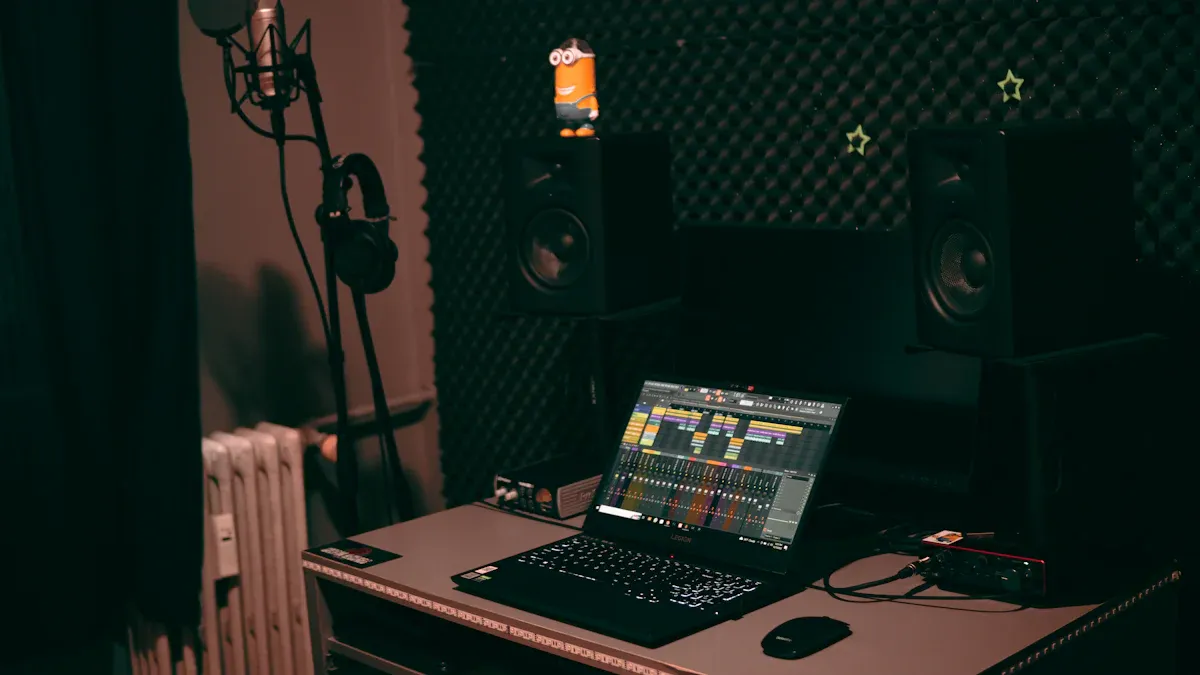
Placing Recording Equipment
The right equipment and placement make a big difference in recording quality. Every soundproof studio booth should include a large-diaphragm condenser microphone for vocals and instruments, a stereo pair of small-diaphragm condenser microphones for percussion and acoustic sources, a reliable audio interface, quality headphones, and one or two preamps. Acoustic treatment, such as foam panels or DIY panels, helps manage reflections and improve sound.
- Microphones: Use a large-diaphragm condenser for vocals and a stereo pair of small-diaphragm condensers for instruments.
- Audio Interface: Connect microphones and instruments to the computer.
- Headphones: Monitor recordings with a good pair of headphones.
- Preamps: Improve sound quality with built-in or separate preamps.
- Acoustic Treatment: Use foam panels or DIY panels to manage reflections.
- Soundproofing: Ensure a quiet environment by reducing external noise.
- Microphone Placement: Position microphones to face away from reflective surfaces and use polar patterns to reduce unwanted noise.
Expert placement strategies, such as close-miking, increase clarity by making the sound source more prominent than background noise. Placing microphones in isolated corners or using portable isolation booths reduces reflections and improves isolation. Monitors should face the listener, with panels placed at reflection points to prevent standing waves. These techniques help achieve clear, natural recordings and allow for better mixing and processing.
Pro Tip: Move microphones closer to the source for clarity, but watch for the proximity effect, which can boost low frequencies. Use portable isolation booths or panels to control reflections and improve sound quality.
Building a soundproof studio booth at home becomes easier with careful planning and the right materials. Users can:
- Add soft materials like rugs or curtains to absorb sound.
- Upgrade doors and windows for better isolation.
- Arrange furniture to reduce echo.
Each step helps create a space tailored for clear, professional recordings.
FAQ
How thick should the walls of a soundproof booth be?
Experts recommend walls at least 4 inches thick. This thickness allows for insulation, double drywall, and air gaps, which help block outside noise.
Can someone use regular foam instead of acoustic panels?
Regular foam absorbs some sound. Acoustic panels, however, provide better absorption and control across more frequencies. Studios achieve higher sound quality with professional panels.
What is the best way to ventilate a soundproof booth?
Silent fans with baffles or muffler boxes move air quietly. These systems keep the booth comfortable and maintain sound isolation for longer recording sessions.